I came across this website on how to add an adjustable waistband to kids pants like jeans. This is going to really come in handy since my 4 year old fits into size 6 pants tall wise, but not quite waist wise. I can't wait to try it!
http://www.kundhi.com/blog/2009/11/24/how-to-add-adjustable-elastic-to-kids-pants-in-5-easy-steps/
Thursday, September 15, 2011
Thursday, April 14, 2011
Decadent Cupcake
Cupcakes are really fun to make fancy, and it's pretty easy too. The trick is all in the toppings. I made some decadent cupcakes for a birthday party that were both pleasing to the eye and the mouth. The green ones in the back are white cake bater with peppermint in it, with vanilla frosting that I also put peppermint in. I added some green food coloring to make it a mint color and sprinkled mini chocolate chips on it.
Next are the chocolate ones in the middle. I used chocolate cake batter, chocolate fudge frosting, then I got some white chocolate chips, crushed them and sprinkled them on top.
Lastly are the white ones in the front. They are carrot cake batter with cream cheese frosting and almonds on top.
Create your own, I made 5 dozen cupcakes for about $5, that's a lot cheaper then buying something from the store, it tastes better, and you'll love sharing these with your friends.

Tuesday, March 29, 2011
Easter Dresses


Easter comes every year and it is a fun tradition to make your little family outfits for it. These are the dresses I made for my girls, and the boys have matching ties.
Frozen Burritos


So I am getting into the 'cook one day for a month' idea. I made been/beef/cheese burritos, wrapped them in saran wrap and threw them in the freezer. I used home made refried beans and put my favorite seasonings in the meat. To help with organization in the freezer, I put them all in a cereal boxes. They heat up well in the microwave, and it saved us a lot of time and money.
Birthday Banner


I made this 'Happy Birthday' banner at a church activity. The triangles are simply surged, sewn to a long ribbon and the letters are hot glued on. We keep it up for a week following the kids birthday and they love it.
Friday, March 4, 2011
Aprons


I made these aprons from the pant legs of my husband's dress pants. They are really good material, hold up well, and wash well. There was a hole in one of the knees which I patched and put a pocket over. All I did was cut out the apron, hem it, and add ribbon for the ties!
Saturday, February 26, 2011
Cloth Diapers


I've decided to switch over to cloth diapers. Buying them can be a big expense, so I decided to make my own. After all the materials I purchased, they came out to about $2.50 per diaper, that beats the store by $15! I found a few websites that helped me figure out the materials and patterns: http://www.littlefornow.com/pages/cloth-diaper-fabrics.php
It only took me a few hours, which isn't too bad. The thing I like about this design is it has tabs to bring over the Velcro (the rough loop part) for when you wash it so it won't stick to everything. When I made my soaker pad, I added the PUL waterproof material on the bottom layer to help with leaking. I also sewed an M for medium or a L for large on the back of the diapers to tell what size it is. They hold up great for washing and should help us save some money.
Wednesday, February 23, 2011
Nursing Pads


Nursing pads can become expensive when you nurse. I decided to make my own. They consist of 3 different layers. The bottom layer is made out of PUL material (which is waterproof, this stops the leaks), the inner layer is a bamboo filler (this soaks up everything, it's 50% bamboo (which has natural antibacterial properties), 50% cotton so it breaths too), the last layer is a cute flannel which is 100% cotton. I traced a CD and cut it all out, then I did a quilters stitch putting the batter and the flannel together so it wouldn't bunch up during washing. Lastly I surged all the layers together and voilà, no more buying nursing pads.
Friday, February 18, 2011
Nursing Cover


I am nursing my third child and have never had a nursing cover, so I decided to finally make one. It was actually pretty simple. I used the following webiste: http://blisstree.com/live/free-pattern-to-sew-your-own-nursing-cover/
I added some ruffles to the front of it to make it more decorative, but it works great!
Wednesday, February 16, 2011
Pinto Beans

Canning pinto beans sounds intimidating, but it is one of the easiest things I have canned. I wash and sort some beans (honestly I don't measure how many beans I put in each jar). (Prepare your jars and canning materials first by sterilizing them) I fill up each jar a little less then 1/2 way with dry beans. I then fill them with water just below the lid rings. For a pint, I will add 1/2 tsp salt, for quarts I will add 1 tsp salt. Pressure cook at 10lbs for 70 (pints) or 90 (quarts) minutes. Take it out and let it cool. I love to use my canned beans as my refried beans by just putting it in my blender and adding a little bit of water until it is to the consistency I want.
Saturday, February 12, 2011
Piano

I love the sound of music in my home. I would love a baby grand in our home. But with budget lacking a yard sale piano must do. It needed a little help inside and out. What a better way to make the piano a focal point than to paint it.
2 cans spray paint primer
5 cans colonial red spray paint
1 happy family
Murals


Adding a mural to a wall is a great way to add art work to a room. I did this one in my daughters bedroom, and she loves it.
Friday, February 11, 2011
special plate

I made a special plate at a paint-your-own pottery place. I use the plate for anyone in the family for a special event (birthday, 1st day of school, accomplishments, etc). The kids feel extra special for the attention they receive! If you don't feel up to painting your own, just buying a special unique plate works as well!
Birthday streamers


The first time I put up streamers was the night before my son turned 2. Ever since then, it has become tradition for each kid in our family to wake up to streamers everywhere I could on their birthday (bedroom bed, fan (their favorite so far), door, going down the stairs, into the kitchen, their kitchen chair for a special breakfast). My son even reminded me during his last birthday to get streamers. Darn, he took the surprise out of it last year, but he still enjoyed it. I had to get a little more creative for him when he was 5 to make it a little different.
Tu-Tu

My sister-in-law made this for my daughter for her 3rd birthday. There are strips of ribbon in between the layers of material that was a cute touch.
Kid blanket
An easy to do blanket. Here's the steps.
1) With fuzzy fleece (to desired size), sew an edge under.
2) Pin large ric-rac around the entire edge and sew with string matching the ric-rac on top, and string matching the blanket underneath. (In this case, pink string was on top, and green was on bottom.) I bought ric-rac by the yard so it was in one piece.
3) All done!
Stuffed Giraffe


My daughter was wanting to do a sewing project with me, so we decided to make a stuffed animal. There are several types of animal friend patterns available at the craft store, and we found this cute one by McCall's. It is a good project to use up some scrap materials and it only took us about 1 1/2 hours. We had fun making it, my daughter named her Rosie.
Cream of Mushroom Soup

One thing I love to use in my cooking is cream of mushroom soup. There is only one problem though, it is pretty expensive. I decided to try making my own and canning it and it was very good! Here is the recipe:
1/3 cup butter
1 pound mushrooms, chopped or sliced
3/4 cup flour
2 quarts meat stock (chicken bouillon may be substituted)
1 T. salt
1 tsp. lemon juice
(the recipe didn't call for it, but I added 1 onion)
(the recipe didn't call for it, but I added 1 onion)
DIRECTIONS
Melt butter.
Add mushrooms and cook until brown.
Add meat stock, saving enough to mix with the flour.
Make a paste with meat stock and flour.
Mix all ingredients and heat until it boils.
Put in jars and process in pressure canner for 40 minutes at 10 lb. pressure.
When opening to use, add equal amount of milk and soup.
Makes 5 pints.
Thursday, February 10, 2011
No More Mopping!

A good portion of my house is tile, it was such a chore to keep them clean. I didn't mind sweeping often, but mopping was the thing that I absolutely hated! I purchased a Shark vac-then-steam a few months ago and I actually look forward to mop day. Okay, okay, I don't actually mean I look forward to it, I mean I kind of enjoy it (I know I'm sick). The vacuum part takes a little longer then I would like, so I still sweep, but steaming my floors is so nice. Something I like to do is add some essential oils, like lavender or eucalyptus, to the steaming pad before I do it, that way my house smells amazing when I'm done because it steams it into the air. No more bucket and mop, I can clean, even disinfect my floors without any cleaners and only 16 oz. of water.
Children's Museum of Phoenix


My sister introduced me to the Children's Museum of Phoenix. To describe it using words would not do it justice. This place is amazing. If you have kids, this is such a fantastic place for their minds to explore and their creativity to run rampant! They have painting, scarf vacuums, a humongous play place, a kitchen, a fort room a grocery store, a noodle forest... the list just goes on and on. To make things even better, the first Friday of every month is free, yes free. Check it out, you won't be disappointed. http://www.childrensmuseumofphoenix.org/
Cinnamon Rolls

We recently purchased a stand up freezer (hurray for craigslist) and I am trying to create pre-made meals and dishes that I can freeze so I don't have to cook every night. One of my first freezer dishes was cinnamon rolls. I found this great recipe on http://whatscookingamerica.net/Bread/CinnamonRollsFantastic.htm that worked out really well. I added raisins and almond slices for my filling. These were easy and tasted fantastic, I would highly recommend them.
Wednesday, February 9, 2011
Christmas Wreath and Garland


My house was looking pretty bare for Christmas decorations, so I decided to make some. First I picked up a bare wreath and some garland from the local craft store. Then I decided what color decorations I wanted, for these I chose to go with green and silver. I picked up medium sized tree ornaments, jingle bells and wired ribbon from Walmart. I layed out the ornaments and bells on the wreath and garland before attaching them with craft wire, that way I knew the spacing would be good. After I attached them all, I made a few huge bows and wrapped the ribbons where I wanted them. It really wasn't too much work and cost way less then buying a decorated from the store.
Popcorn


Popcorn has so many great options to make it taste great. Although I enjoy the plain popcorn, it is fun to dress up too. One great recipe is making it covered in sweetness, I like white chocolate.
My favorite way is to get 1/3 cup popcorn kernels and pop it in my air popper. I then get 2 cubes of vanilla flavored bark, this is found in the cooking isle of your grocery store. I melt the 2 cubes of bark in the microwave for about 2 minutes. I stir it and add about 1 tsp of salt. I then drizzle it over my popped popcorn and toss it with 2 spoons until it is evenly covered. Let it cool for 1-2 hours before devouring it, I know it will be hard.
The pictures shows both the chocolate flavor bark and the vanilla flavored bark. My favorite brand I have tried so far is found at Frys, I don't like the walmart one too much. Melting a chocolate bar such as Hershy's tastes amazing for the chocolate, I prefer it's taste over the bark, but the Hershy's chocolate doesn't harden all the way after you heat it up and put it on the popcorn (that may just be because I live in AZ where it is hot all the time). Whatever you do, it is a pretty easy way to dress up your popcorn, don't forget the salt, it really brings out the flavoring.
This is a great treat for a movie night in, or something fun for a party. Enjoy!
Monday, February 7, 2011
Sweet Corn
One of the things I love about living in the valley is the farmers markets that allow us to get produce for dirt cheap. One of the favorite things I love is corn, at the right time of year you can get it 10 ears for $1. I love to freeze my corn so I can have it year round. The secret to making it taste good it to buy it and prepare it as fresh as you can, also you have to blanch your corn before you freeze it. This is the website I used to freeze my corn: http://www.pickyourown.org/freezingcorn.htm
I also love to make creamed corn. Creamed corn is perfect by itself, in biscuits or on top of mashed potatoes. This is the website I used to do my creamed corn:
http://www.pickyourown.org/howtocancreamedcorn.htm

How & Why to Blanch Vegetables for Freezing
When the water in food freezes, it stops much of the cellular activity that normally causes spoiling. But there are certain enzymes in vegetables that can continue their nefarious deeds in the quiet and dark of the freezer. Blanching — either steaming or boiling the food briefly — destroys the enzymes that cause the loss of nutritional value and flavor. Onions, peppers, and herbs do not need to be blanched. Squash, sweet potatoes, and pumpkin should be fully cooked before freezing. All other vegetables should be blanched.
To blanch by boiling, use at least a gallon of water for a pound of vegetables. Put the vegetables in a wire basket, submerge them completely in the boiling water, cover with a lid, and begin timing. To blanch by steaming, put the vegetables in a steamer basket and suspend it above an inch or two of boiling water. Cover the pot, and begin timing as soon as steam starts to escape from under the lid. With either method, shake the basket a couple of times to ensure that all vegetable surfaces are exposed to the heat. After the allotted time, remove the basket, and plunge the vegetables into a bowl of ice water to stop the cooking. Once cool, remove them, drain thoroughly, and package for freezing.
The old Joy of Cooking provides the following blanching times for various vegetables. The Mmes. Rombauer and Becker say that to preserve the natural color of artichoke, eggplant, mushroom, and sweet potato, soak the vegetables for 5 minutes in a solution of 1 teaspoon of ascorbic acid (vitamin C) to 1 quart of water.
There is a great chart on http://www.ochef.com/617.htm that shows boiling times for blanching different vegetables. This is a good resource for preparing other vegetables.
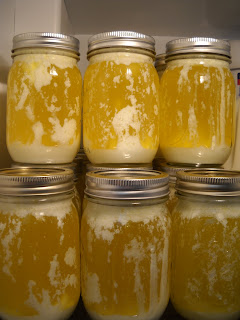
How to Can Butter
Canning butter is easier then you think. It is a great alternative to freezing your butter (for those who don't have the room) and it has a shelf life of up to 3 years!
There are few ways to can butter. I followed directions found on this website, http://teresatronierphotography.blogspot.com/2009/11/butter-in-your-food-storage.html
It was pretty simple, just make sure your jar lips are REALLY clean and free of butter before you start canning (after all the butter is in). I had a few jars that didn't seal properly because of it.
Have fun!!!


Subscribe to:
Comments (Atom)